
Web Application Security Testing with OWASP ZAP
Hi guys, I am back with a new blog post related to security testing. I found a really cool tool for the above purpose and the best thing about it is, its is not only easy to use, it is a completely free and open source tool !!! First of all let me introduce the tool to you.
1. Introduction
1.1 What is ZAP
OWASP ZAP is the short form for Zed Attack Proxy. ZAP is one of the world’s most popular free security tools and is actively sustained by hundreds of volunteers around the world. It can be used to automatically find security vulnerabilities in web applications while you are developing and testing your applications. Zap is a completely free and open source tool and it is known as an OWASP flagship project. It is known as ideal for beginners, but it is commonly o used by professionals as well.
1.2 Why ZAP
Here are few facts that the ZAP is found to be a good choice for security testing.
· Free, Open source
· Involvement actively encouraged
· Cross platform
· Easy to use Easy to install
· Fully documented with comprehensive help pages.
· Work well with other tools (Jenkins)
· Under active development
1.3 Features of ZAP
Here are few features of ZAP tool
· Intercepting Proxy
· Active and Passive Scanners
· Traditional and Ajax Spiders
· WebSockets support
· Forced Browsing (using OWASP DirBuster code)
· Fuzzing (using fuzzdb & OWASP JBroFuzz)
Lets see how to set up OWASP ZAP.
2. Getting Started with ZAP
2.1 Installing ZAP
1. Prerequisite: — make sure your PC has Java 7 or above
2. Download Zap from bellow link
https://github.com/zaproxy/zaproxy/wiki/Downloads
3. Double click on exe and observe that the following window appears. Click on next.

4. Select “I accept the agreement” radio button and click on next.

5. Select Standard installation and click on next.

6. Click on Install

7. Click on finish.

8. Double click on the Zap Icon to view the following screen.

2.2 Configure ZAP as a Proxy
- In ZAP UI select Tools -> Options

2. Select Local Proxies. Select localhost as Address and a port on your desire and click OK

3. Open the browser and navigate to Network Settings.
Ex- for Mozilla Fire fox Options->Network Settings
4. Select Manual proxy configuration option and given the same port ID you gave for ZAP and click on OK

2.3 Installing certificate
After above configuration since all requests and responses are proxied by ZAP, the certificate verification will fail for sites using secure connections (HTTPS) and the connection will be terminated giving the following error.

In order to stop that from happening, the certification needs to be installed.
- In ZAP UI select Tools -> Options

2. Click on Dynamic SSL Certificates. Click on Generate and save the Certificate.

3. In Firefox select Options -> Privacy and Security

4. In Privacy and Security menu select Certificates -> View Certificates

5. Select Authorities -> Import, brows and import the certificate saved.
6. Make sure to check the check boxes

7. Observe that the certificate is successfully added.

8. Restart both ZAP and the Browser
Now we all know how to set up OWASP ZAP, and its time to start testing !!!!!!!!
3. Perform Penetration testing using ZAP
3.1 Intercepting Proxy
ZAP is well known as a “man-in-the-middle proxy.” It is one of the best uses of the tool. ZAP stands between the tester’s browser and the web application and allows to intercept and inspect traffic sent between browser and web application. It allows the tester to modify the contents of the request and then forward it to the destination.

1. Make sure that the ZAP and the browser of your choice is configured properly
2. Open the web application of your interest in the configured browser
3. Observe that the site is listed in the sites grid in left side of the ZAP UI

4. Perform a task in the web application. Ex: Login
5. Observe that the call is captured in the list

6. Select The call and observe the Request and response tabs in the right-side panel to view the request and response calls.


3.1.1 Manual Request editor
Once the traffic is captured by ZAP tester can resend it as is or resend after manipulating it
1. Select the call that you want to edit or resend from sites tree structure
2. To open the Manual Request editor menu
a. Right click on the call and select open Resend with Request Editor
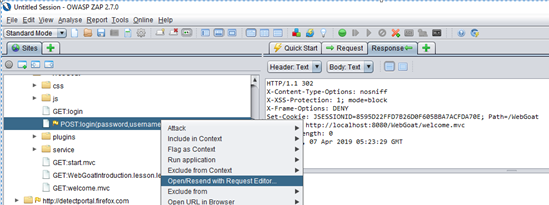
b. Right click on the request and open Resend with Request Editor

3. If you want the resend the same call click on Send or change the request and send for manipulation.

4. Observe the response
3.1.2 Break Option
Break option can be identified as a very important option where the tester is allowed to intercept the request before it is sent to the browser and intercept the response before it is sent to the Browser again.
1. In order to add a break point
a. Right click on the Site and select Break.

b. Click on the green button in the menu bar
2. Perform the task you want to intercept
3. Observe that the browser is waiting

4. Change request as needed.

5. Click on the Submit and send to next request or response

6. Observe that the browser is still waiting
7. Again, click on the Submit and send to next request or response. Keep submitting unlit the response is received to the browser
3.2 Passive Scanning
When compared with active scan, a passive scan is a harmless test that tries only for the responses and checks them against known vulnerabilities. Passive scan does not modify the website data. Thus, is really safe for the websites for which we do not possess permission. But the down side is that it is not as powerful as active scan where it could not detect a SQL Injection with passive scan which was known as OWASP number 1 vulnerability in 2018.
Steps of performing a passive scan
1. Make sure that the ZAP and the browser of your choice is configured properly
2. Open the web application of your interest in the configured browser.
3. Navigate through the pages and perform your test case scenarios.
4. Observe the test results

3.3 Active Scanning
Active scan is the type of testing which attacks the website using known techniques to find out vulnerabilities. Active scan modifies data and inserts malicious scripts to the website. Thus, it is crucial to deploy the application of your interest to a new environment before testing the website against security issues
Special Note: Please make sure you have proper permissions before you run the active test
3.3.1 Quick Start Scanning
The most forthright way of doing an active test against a website is to use the Quick Start option that is displayed by default when ZAP UI is launched. The tester has to simply put the URL in the Quick Start window and click on attack

The process happens in two steps
1. Spider
2. Scan
3.3.1.1 Spider
Spider is to be used to crawl the website of interest. Once the user provided the URL, ZAP uses it as a starting point to discover the website to identify all of the hyperlinks of the application. Please kindly note that the links that directs the user outside the domain will be ignored. The Spider tab given at the bottom of the ZAP UI displays the links as the ZAP is examining them. Same time ZAP passively scans the links.
3.3.1.2 Scan
After the Spider is done the active scan is started. At this point the application is teste for a predefined set of attacks provided by ZAP. At the end the results are displayed in the Alerts tab

3.3.2 Active Scan
Tester has to follow the following steps.
1. Set the login
a. Perform the login in the browser with correct credentials.
b. Identify the call in the Sites list tree structure
c. Right click and select Flag as context-> Default Context: Form-Based Auth Login Request.

d. Observe the Session properties pop up and click on Ok

2. Ignore the Logout call
When the scan is on, there is a possibility that the application goes to logout and the session is terminated. In order to avoid that risk we ask ZAP to ignore it.
a. Perform the logout in the browser.
b. Identify the call in the Sites list tree structure
c. Right click and select Exclude from -> Scan

d. Observe the Session Properties pop up and click on OK

3. Right click on the site to be scanned and select Attack ->Active Scan

4. Observe the Active Scan pop up and click Start Scan

5. Observe that the progress is given in the Active Scan tab bellow.

6. When the scan is completed the result is displayed in the Alerts tab

3.4 Spider
Spider is to be used to crawl the website of interest. Once the user provided the URL, ZAP uses it as a starting point to discover the website to identify all of the hyperlinks of the application. Please kindly note that the links that directs the user outside the domain will be ignored. The Spider tab given at the bottom of the ZAP UI displays the links as the ZAP is examining them. Same time ZAP passively scans the links
Tester has to follow the following steps.
1. Set the login
a. Perform the login in the browser with correct credentials.
b. Identify the call in the Sites list tree structure
c. Right click and select Flag as context-> Default Context: Form-Based Auth Login Request.
d. Observe the Session properties pop up and click on Ok
2. Ignore the Logout call
When the spider is on, there is a possibility that the application goes to logout and the session is terminated. In order to avoid that risk we ask ZAP to ignore it.
a. Perform the logout in the browser.
b. Identify the call in the Sites list tree structure
c. Right click and select Exclude from -> Spider

3. Right click on the site to be scanned and select Attack ->Spider

4. Observe the Spider pop up

5. Observe that the links are displayed in the Spider tab bellow

3.5 Fuzzing
Fuzzing is a type of testing which can be performed through ZAP where the user sends unexpected or random data as the inputs of a website. When key inputs of the website such as search, login, user registration etc… are fuzzed coding errors and security loopholes can be identified?
Steps
1. Capture the call you want to test
2. In order to open the Fuzzer window perform one of following steps
a. Identify the call in the Sites tree structure, right click, Select Attack and select Fuzz

b. Identify the call in the History tab, right click, Select Attack and select Fuzz

c. Highlight a text in Request tab, right click and select Fuzz

3. Observe that the Fuzzer window is opened

4. Select the place that you want to give input values. (If you followed above 2.a click on Remove before this step)
5. Click on add and observe that the payload pops up is given
6. Click on Add and observe that the Add Payloads pop up is given. Select Strings from the dropdown menu and given the values you need to add and click on add.

7. Again, click on add button, select File Fuzzer from dropdown, expand jbrofuzz node and expand SQL injection node and check SQL injection 101
8. Click on in Add Payload pop up and Payload pop ups

9. Click on Start Fuzzer

10. Observe that the details of each call are displayed in the Fuzzer tab.

11. Check the responses for abnormal results. For this example, the application has returned all the results from the target table for the input (1' or ‘1’=’1) which is a vulnerability for SQL Injection.

3.6 Generate reports
Zap provides comprehensive reports on the scans done. There are few types of reports in ZAP. Users just have to click on Reports -> Select the type of report
3.6.1 HTML
Very user-friendly report. Displays the details of the scan in very comprehensive manner.

3.6.2 XML Report

3.6.3 JSON Report

3.7 Interpret scanning results
The result of the scan is displayed in the lower left grid when the Alerts tab is selected. The information on each risk is given in the right grid. After the scanning is performed the development team can take necessary corrective actions.

The interpretation of the Alerts are as follows.


