Run Maven Selenium UI Automation Tests with GitHub Actions

Continuous Integration (CI) has become a buzz word these days. Many organizations are moving to words CI and as Quality Assurance Engineers we should get to know about these trends. First of all, Let’s find out what Continuous integration (CI) is. Continuous integration (CI) is a software practice that requires frequently committing code to a shared repository. When you committing the code, you can continuously build and test the code to make sure that the commit doesn’t introduce errors. GitHub Actions provides workflows that can build the code in the repository and run the tests. Workflows in GitHub Actions can be run on GitHub-hosted virtual machines, or on machines that you host yourself. In this example I am running my tests in a GitHub-hosted virtual machine.
Prerequisite
You should have a Maven Selenium project which is running in headless mode without any issues in your local machine
Adding the project to GitHub
1. In command line get inside the folder where your code is
2. To check whether git is already initialized run the command ‘git status’
3. Since git is not yet initialized you will get the following error
“fatal: not a git repository (or any of the parent directories): .git”4. Navigate to GitHub and login to your GitHub account.
5. Click on the “+” icon in the top right corner of the GitHub page.

6. Select ‘New Repository’
7. Name your repository
8. Specify whether you want your repository to be public or private
9. Click on ‘Create Repository’.
10. Copy the URL of the repository
11. In the command line enter the command ‘git init’. You will see the following result
Initialized empty Git repository in <<your local folder>>12. Enter the command ‘git add .’
13. Enter the command ‘git commit -m “first commit” ’. You will see the following result.
Initial commitUntracked files:<<List of files in your project>>
14. Enter the command ‘git remote add origin <<URL of the repository>>’
15. Enter the command ‘git push ‒ ‒ set-upstream origin master’
16. Navigate to your GitHub account and click on Repositories to find your newly created repository. Select the repository and observe that your project files are in it.
Creating a work flow
- Inside your repository click on “Actions”

2. Observe the Continuous integration workflows. You may see many different workflow types. In this example I am going to select “Java with Maven” work flow since my test code is a Java Maven Project. Click on “Set up this workflow”.

3. You may see maven.yml file. Replace the existing code with the following. This will run your test after each push to your code on a GitHub-hosted virtual ubuntu machine
name: Java CIon: [push]jobs:build:runs-on: ubuntu-lateststeps:- uses: actions/checkout@v2- name: Set up JDK 1.8uses: actions/setup-java@v1with:java-version: 1.8- name: Build with Mavenrun: mvn test
4. Click on “Start commit”.

5. Click on “Commit new file”.

6. To see the logs click on “Actions”

7. Congratulations!!! You created your first CI work flow.
Schedule your test run
As I explained earlier the .yml file we have right runs your test after each push to your code. To schedule your test, you have to use “schedule” key word. The shortest interval you can run scheduled workflows is once every 5 minutes. In order to schedule a cron syntax is use.
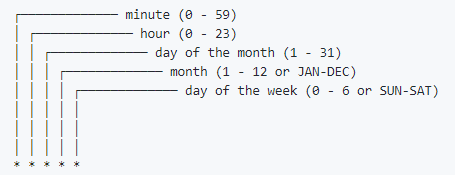
Examples:
0 */2 * * * — At minute 0 past every hour
*/30 * * * * — At every 30th minute
0 22 * * 1–5 — At 22:00 on every day-of-week from Monday through Friday
0 1 1 * * — At 01:00 on day-of-month 1
You can generate and verify your cron syntax from crontab guru.
The example given bellow is to run your test at every 30th minute
name: Java CIon:schedule:- cron: '*/30 * * * *'jobs:build:runs-on: ubuntu-lateststeps:- uses: actions/checkout@v2- name: Set up JDK 1.8uses: actions/setup-java@v1with:java-version: 1.8- name: Build with Mavenrun: mvn test
Execute tests in multiple events
You can use the following syntax to run execute your code in different events
on:push:pull_request:schedule:- cron: '*/15 * * * *'
Trigger the test automation project through the work flow of the applications to be tested.
In order to do that you have to implement Cross repository triggering. Please follow the bellow link for step by step description on Cross repository triggering in GitHub Actions.
Cross Repository Triggering in GitHub Actions-Trigger your Test Automation project through the workflow of the Application.
References
1) https://docs.GitHub.com/en/free-pro-team@latest/actions/reference/events-that-trigger-workflows
3)https://docs.github.com/en/free-pro-team@latest/actions/reference/events-that-trigger-workflows